


Hi Members, especially new owners! We have launched a collaboration with TheBMWCoder to offer a promotional coding price for our members at $50 for unlimited coding. Most of us already have our cars coded!
Don’t let the weak air conditioning and annoying start-stop ruin your ownership experience. Customize your car to your liking!
Use this link below
https://tinyurl.com/TheBMWCoder
Address: 3 Kwong Min Rd, Singapore 628706
Contact person : JOSEPH +65 9388 3432 / KRISLYN+65 8444 1517
https://www.facebook.com/SinChuanHinTyres
Mobile Services available 24/7 !!!
Wheel Alignment – Coming soon
Sports Rims – Coming soon
https://accordinsurance.com.sg/quotesystem/
Exclusively for only our 2GAT members
1002 Bukit Merah Lane 3 #01-83 S (159719)
Mon to Sat: 9.00am to 6.00pm
Contact Person : Jacky 8649 9237
50 Bukit Batok St 23, #01-15, Midview Building, S659578
Contact Person: MOHAN
Mobile: +65 9456 5427
Click the below link for the manual (Open in new tab)
Here’s an option that you can consider signing-up!
Contact QBE below for a quote or more information (ProductProtection.SG@qbe.com)
Please note under General Car Insurance rules : you are required to inform your insurer even if you do a private settlement (ref Onesg.motoring)
DO I HAVE TO INFORM MY INSURER EVEN THOUGH THERE IS NO DAMAGE TO MY VEHICLE?Yes, always report all accidents to your insurer no matter how minor the
accident may be, even if
there is no visual damage
or even if you have made a
private settlement with the
other driver.
This is because you cannot
be fully certain that the other
party will not file a claim
against you later.
You may find yourself in a
position of having your claim
prejudiced or declined later
by insurers.
WHAT HAPPENS IF I CHOOSE
NOT TO REPORT THE
ACCIDENT TO MY INSURER?
Failure to do so will affect
your No Claims Discount
upon renewal of your motor
insurance and will prejudice
your claim.
Address: 9 Tagore Lane #3A-22, Singapore, Singapore 787472
Tel: 6254 5575 (ANNA)
Contact person : EDMUND Mobile: 9109 4429 / 9247 9969 (Whatsapp only)
https://www.pitstoptyres.com.sg/
https://www.facebook.com/pitstoptyressg/
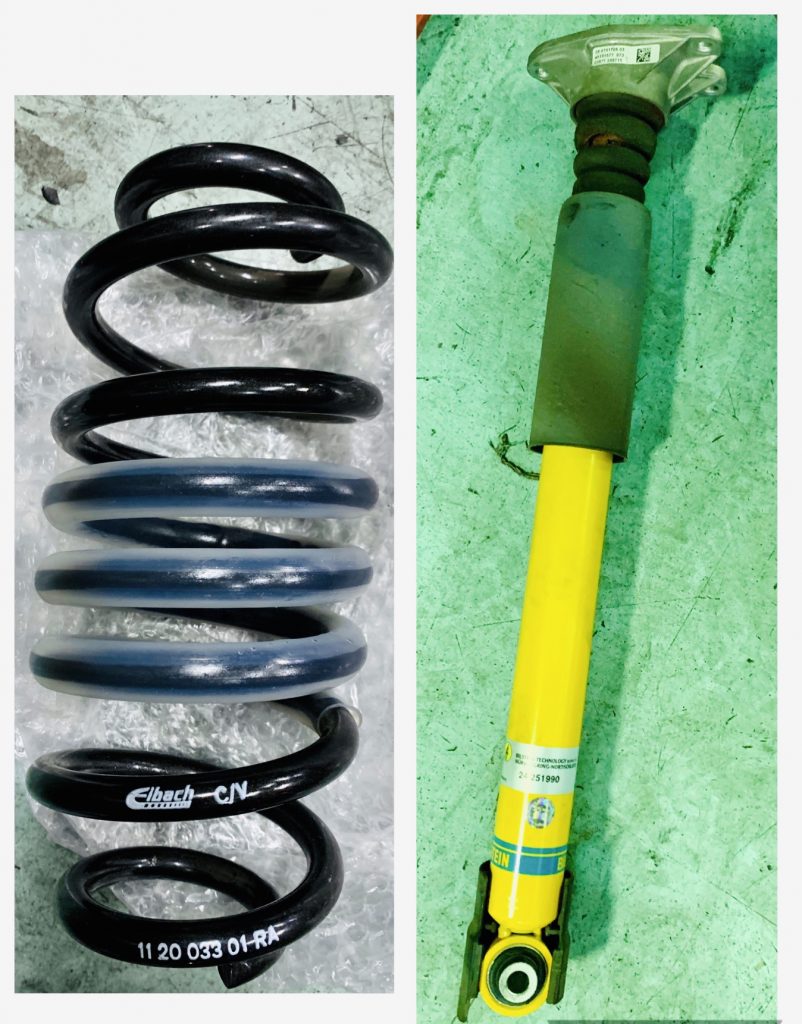
After almost close to 4 months of waiting, finally my fav handling mod is here!
As I previous user of Bilstein B12 on a BMW E90, I really like B8 shock absorbers and Eibach Springs. They couple really well, balance between performance and comfort. There is no funny creaking sound which will happen in most coilover. Even found some of the branded ones.
This is Bilstein have to say:
“The BILSTEIN B12 Pro-Kit allows vehicles to be lowered up to 40mm. The kit has the perfect combination of sporty dynamics, aesthetics, and load bearing capacity.
This BILSTEIN B12 kits consist of tailor-made BILSTEIN B8 high-performance shock absorbers that are perfectly matched with EIBACH springs for an optimal ride.”
Is unwrap time!
Assembly before mounting onto the car
Installation completed!
(P.s Updated photos during tires changed)
Compare before and after!
Eng Soon Auto
13 Kaki Bukit Road 3,East Point Terrace SINGAPORE 417833
TEL: 6291 7775 Whats app: 8679 9648
Integrated Global Network Enterprise
9 Kaki Bukit Road 1, #01-07/08 Eunos Technolink SINGAPORE 415938
TEL: 63483083
Goldenlink Auto
They have a few Branches so please see which is closer for you :
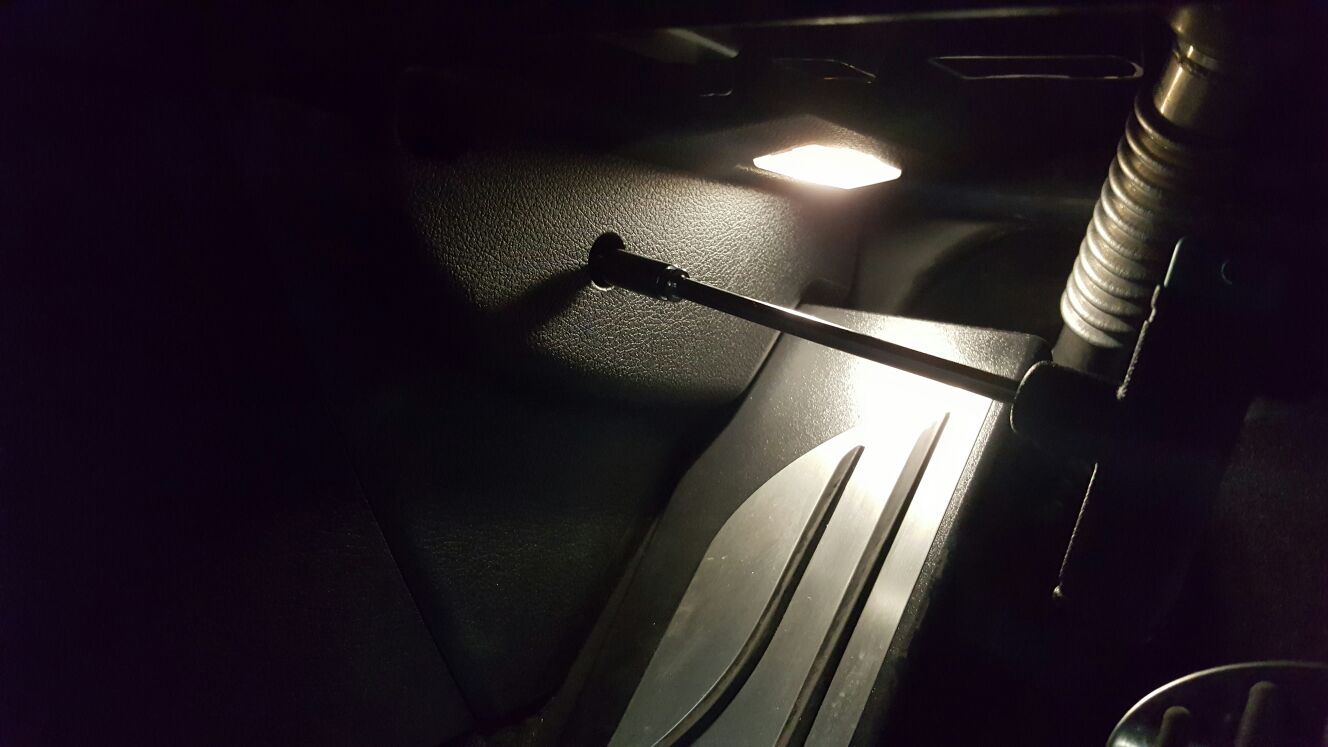
Location Driver’s side seat Foot well
Step 1:
Use a torx screw driver to unscrew the torx screw located under the driver’s steering wheel near the foot resting well as shown below:
Step 2:
Once unscrew, you can take out the plastic cover which will reveal the air con filter holder.
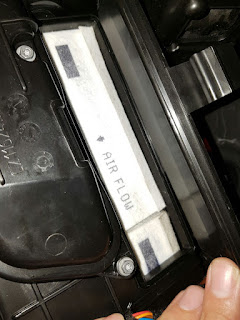
Step 3:
Open the air con filter holder flap by pressing the handle as shown in the highlighted arrow. Your finger should be able to open this flap without any tools but be extra careful to avoid getting cuts.
Step 4:
Once the air con filter holder flap is opened, you will be able to see the air con filter. Take it out for inspection and vacuum or change it if required. Use a pair of pliers if it is difficult for your fingers to pull it out.
Note the air flow arrow direction and make sure to put it back the same way as indicated below.
Youtube Video of replacement:
https://www.newtis.info/tisv2/a/en/
Key in your VIN and choose your ride and there you go, very useful for brothers who like to hands on (DIY)
Key in your VIN and you will be able to see what equipments and accessories your BMW come with.
Changing your battery in your F-Series BMW Key Fob is easy. Just follow these 5 steps:
1) Press the button and pull out the car key in the direction as indicated by the arrow:
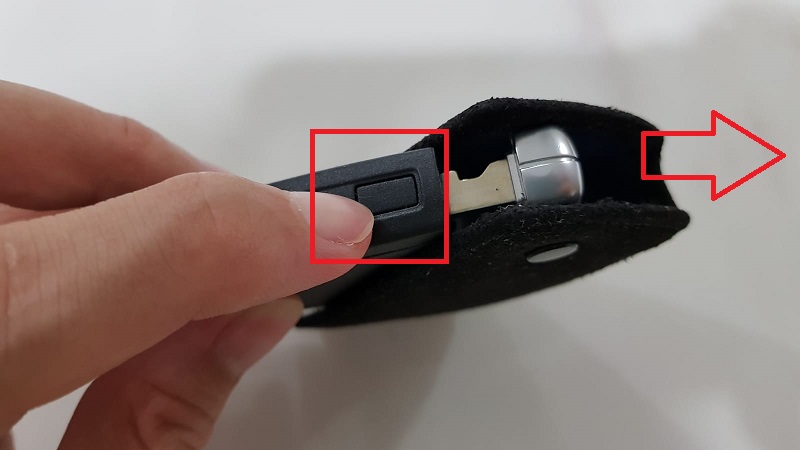
2) Notice the notch at the key fob:
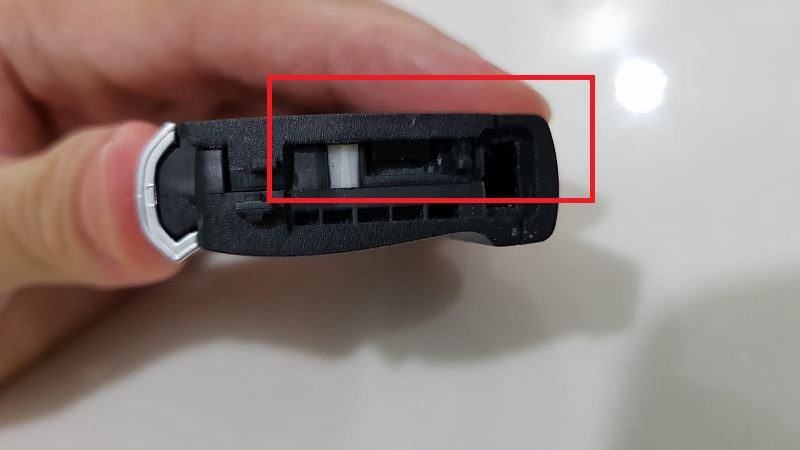
3) Using the same car key, push into the notch and lift the plastic cover up:
4) Slowly lift the plastic cover with your fingers:
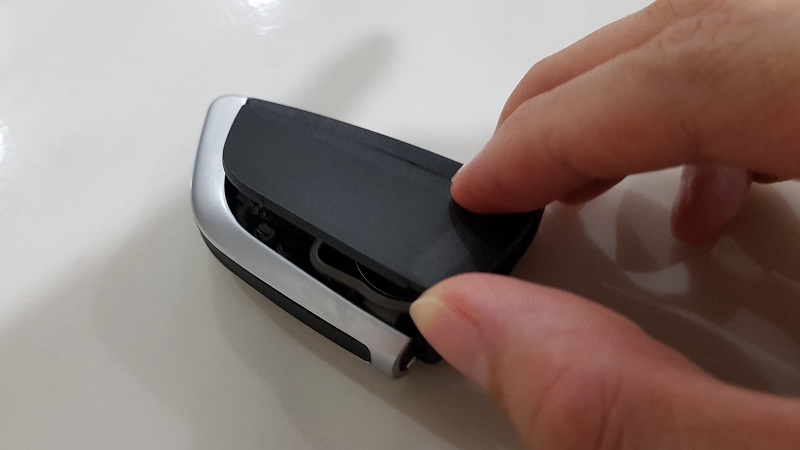
5) Presto! Your key fob has been disassembled, exposing the CR 2032 battery. Time to source for a good CR2032 battery and swap it in!
***Disclaimer – contacts below are for informative purposes only***
1) SAN HE CAR REPAIRER
BLK 1018 YISHUN INDUSTRIAL PARK A #01-348 SINGAPORE 768760
TEL: 67523298 H/P: 9688197
2)Ah Song (ONG Tian Sang Sembawang Motor workshop
1017 Yishun Industrial park A #01-252 SINGAPORE 768759
TEL: 67537879 H/P: 96258308
3)Lye design
10 Ang Mo Kio Industrial Park 2A, #04-04, AMK AutoPoint, 568047
Tel :6483 3353
$40 per dent.
1)Paintless Dent Removal
Blk 5 Toa Payoh Industrial Park,Lorong 8 #01-1269 SINGAPORE 319057
TEL: 96900290
2)Uncle Meng Paintless Dent Removal
TEL: 8113 8001
Address : 9 Sin Ming Dr, #01-40 IND EST SEC C, Singapore 575644
Contact person: Andrew 9693 5058
https://www.facebook.com/bmstuning.shop
Tuning $1180 + Dyno $180 Total $1360
For our members quote BMW 2GT to enjoy a 15% off.
$1180 -15% + dyno $150
$1150 nett includes dyno
For your BMW216i warranty friendly tune solution,
I recommend you our Dimsport RAPID TPM, Plug and play.
In addition
To walk this along with you.
** OCBC Credit Cards Promo – up to 12months interest free Installment plan! No admin fee too! It’s only $116/month 😊
Address: 3 Ang Mo Kio Street 62 #01-12, Singapore 569139
Contact person: Desmond 8121 2879
Address: 8 Kaki Bukit Ave 4, #02-53, Singapore 415875
Contact Person: Ivan 8376 4302
https://www.facebook.com/solar.film.professionals/
SPECIAL PACKAGE FOR 2GT: $450 nett for Highest Graded Platinum 99% heat rejection rate 99% UV with FOC removal of existing films and FOC sunshade with any full car installation.
Address: Blk 10 Sin Ming Industrial Estate Sector C, #01-14, 575645
Tel: 6453 7205
Contact person : AH CHUAN Mobile: 9735 1858 / DAPHNE+65 9759 9989
https://www.facebook.com/taihuattyres/
If you’re deciding if you want to go with BSI or BSI+ or extend it, here’s a an excel so that you can plug in your own mileage (over 2 years) and PML’s quotation to you, then compare costs and make an informed decision.
“Credits to bro’s Andrew Chew & Victor Ng for compiling this for everyone’s benefit.”
Link: https://www.bilstein.com/us/en/product/bilstein-b8/
BMW 2 Gran Tourer (F46)
Front left parts number: BIL-22-251985
Front right parts number: BIL-22-252005
Rear left/right parts number: BIL-24-251990
Consider one of the most cost effective accessories to get
Got mine installed at Bavworks
If However you want a challenge and DIY :
Fancy having a BMW with a MSport steering wheel with Cruise Control and Paddle Shifter?
Look no further!
What you need:
1) MSport steering wheel with air bag. Note that F45/F46 uses a typical F30 MSport steering wheel. F10 (5 series) MSport steering wheel is not suitable for F45/F46 use.
Note that it comes with different options like Cruise Control switch, paddle shifter or even Active Cruise Control and Traffic Jam Assistant buttons.
2) Socket wrench tool set – you will requires 16mm socket to unscrew the hexagon nut on the steering wheel
3) A screw driver or a metal rod to take out the air bag from the MSport steering wheel and your current existing stock wheel.
Here it goes!
Taking out the airbag from MSport steering wheel:
Step 1:
Note the hole behind the MSport steering wheel
Step 2:
Release the airbag from the MSport steering wheel by using the flat bed screw driver or metal rod to push the pin that holds the airbag.
Step 3:
Repeat step 2 on the other hole. The airbag will pop out and then be released from the MSport steering wheel. Take out the airbag and store it carefully.
Now your MSport steering wheel is ready for your install!
Taking out the airbag from stock steering wheel:
Step 1:
Turn off the engine entirely. Pull and lower your steering wheel until it fully extends out. Without using any tools but only your fingers, feels the steering column plastic cover and pulls it out. If it is difficult for you to do that, you can pull out the leather piece first but feeling its edges and pull it out gently. There are no screws attached to it
Step 2:
Lift out the cover slowly. You do not need to take out the cover.
Step 3:
Pull down the bottom cover as well and leave it dangling. You do not need to detach any connectors.
Step 4:
Now, you have full access to the 3 pins behind the steering wheel through the highlighted holes below which allows you to detach the stock BMW airbag.
Step 5:
Facing the steering wheel, start from the bottom hole,use your flat bed screw driver to push the pin to release the airbag pin first. Once the airbag pin has been released, switch on the engine, turn the steering wheel to anti-clockwise, switch off the engine and continue to perform the same procedure to release the airbag pin. Repeat step 5 to access the other pin.
Step 6:
Once all the pins have been released, the entire BMW airbag will popped out and thus can be safely removed. Unplug the three connectors and unscrew the earth wire connector as shown below. Use the socket wrench with 16mm diameter to socket to unscrew the nut and replace it with your MSport steering wheel and plugging in back the two connectors, screw back the nut and then followed by connecting back the air bag connector and snap the airbag back in place to the steering wheel.
Step 7: Done! Give yourself a pat on your back!
Check the horn and all buttons are working especially on the right hand side buttons. For the left hand side buttons and paddle shifter to work, it will need extra coding to be performed.
Time to code Dynamic Cruise Control and Paddle shifter for your car!
Sports Automatic Transmission (2TB) is an optional package offered by BMW. It comes with paddle shift and sports tuned automatic transmission.
So what does it really means?
A quick check in the internet shows that it is an option for BMW 220i series car. That doesn’t mean the lower capacity can’t have this Sports Automatic Transmission (2TB) enabled right?
Our standard configuration comes with VO code 205 which stands for “Automatic Transmission”. To code 2TB, you will need to modify two FDL parameter in these two modules:
1) BDC_BODY -> PADDLES_VERBAULT (set to “aktiv” – default “nicht_aktiv”)2) EGS -> Sport T/M (set to “enabled” – default “disabled”)
Obviously, you need to ensure that your steering wheel is equipped with the paddle shift as well. To be equipped with paddle shift, you can replace your current steering wheel with a M Sport steering wheel with paddle shift or purchase the paddle shift and drill some holes on your steering wheel (Ouch!) to attach it. The “sports” steering wheel that comes as default does not provide the option to retrofit your paddle shift nicely. You have to purchase a different set of steering wheel that comes with paddle shift as standard.
As for the Sports automatic transmission, you will need to set this mode in the EGS module. This will suppose to give you a sportier ride with quicker gear shift at certain RPM which I really need your feedback once you had enable it in your car. I couldn’t find much information on what this 2TB option do to your F45/F46 and need some real feedback on how it performs.
How to VO Code 544 to enable Cruise Control in your BMW F45/F46/F48
Once you have your Cruise Control switch physically installed, you will need to enable your Cruise Control feature in your car through “VO coding”. Note that the procedure is also applicable to enable “Enhanced Bluetooth” feature or other VO code procedure. The modules that are required to be coded will be different though. For example, “Enhanced Bluetooth” will require HU_ENTRYNAV module only.
In order to avoid any VCM update errors (this does not affect your coding), go to the top of ESYS and click Options > Settings > Options tab. UNCHECK both check boxes -> “Update VCM after TAL execution” and “Update MSM after TAL execution.”
1) Start your E-Sys, Click “Read” button and then “Active FA”:
2) Go to “SALAPA-Element” and right click and select “Edit”:
3) Add the value “544,” into the SALAPA-Element and click the save button on the right as highlighted.
4) Click the “save” button to save the file into a XML file with your desired file name.
5) Go to “VCM” section and load the same XML file that you had saved.
6) Right click “calculate FP” and you will see the Vehicle Profile generated.
7) Click the “Write FA FP” button once you are satisfied with your settings which will writes into your ECU memory.
8) To enable Cruise Control for F45/F46/F48, you will need to VO code these 4 modules for F45/F46/ F48:
1) BDC_BODY
2) HU_ENTRYNAV
3) KOMBI (or BKOMBI)
4) DSC2
9) Go to “Coding” section, click “Read ECU” button on the right and then right click on the above-mentioned modules and select “Code”. This will enable the settings required for your Cruise Control. Note that the engine need not be switched off for this operation to work successfully.
10) Test your Cruise Control switch to ensure that it has been enabled successfully. Congratulations!
11) It is recommended to remove the VO Code after the coding has been performed.
If VO code is something that you don’t prefer to modify, you can perform FDL codings only as such to enable Dynamic Cruise Control:
BDC_BODY
PfLinSteeringWheel -> 3140 > LIN_VARIANTE_MFL = DCC_Sports_SLD
HU_NBT
EXBOX 3001 > DCC = aktiv
KOMBI :
FZG_Ausstattung -> 3003 > LDM_VERBAUT = dcc
DSC2
DSC_FAS_CODIERDATEN 3009 > C_Fahrfunktion = DCC
Look no further! This is your ultimate DIY guide in enabling your Dynamic Cruise Control with braking on your BMW!
What do you need?
1) BMW Cruise Control switch ( Part number : 61319263551) for your BMW F45/F46
2) A Torx screw driver
3) A Philip screw driver
4) A pair of scissor
5) 2 x cable tie (small)
6) Some masking or scotch tape to protect your airbag area on the steering wheel
That’s it!
Preparations:
1) You will need to disassemble your new cruise control switch so that you can plug it in with the existing cable on your steering wheel. Cut the cable tie on the wires so that you can pull out the wires safely from the white molex connector and you can put back the cover with its screws back after this operation.
2) You have to perform the same steps for both side of the switches as both switches has to be replaced together to make it work.
3) Paste the masking tape on the marked area around your air bag to prevent from accidental scratches as shown below:
Here are the steps!
Step 1: Rotate the steering wheel to your left:
Step 2: There is a hole just on the steering wheel just behind the speed limiter switch. Use your Torx screw driver to reach out to the hole behind to unscrew the torx screw. You may need to adjust your steering wheel to full extension mode to use your Torx screw driver more effectively.
Once the screw is out, you will be able to pull out the switch slowly by hand. Note: Be prepared! The horn may accidentally be triggered no matter how careful you are!
Step 3: Cut the cable tie that is tied to the multi coloured wires. Unscrew the three screws behind the switch using your Phillips screw driver.
Step 4: Slowly pull out the cover.
Remember that the PCB board is electrostatic sensitive. Try not to touch it with your bare hands!
Step 5: Unplug the PCB from the molex connector.
Step 6: Connect it with your new Cruise Control switch.
Step 7: Put back the cover and the 3 x Phillips screws. Use a new cable tie to tie the wires back as well.
Step 8: Push the switch back slowly to the steering wheel. You may want to put some tape protection besides the edge of the air bag/horn before performing this operation to avoid scratches. Otherwise, you can always use a fine sandpaper to sand off those scratches. Note: Be prepared! The horn may accidentally be triggered no matter how careful you are!
Step 9: Looks completed? Well not quite so. You still need to replace the right hand side switch as well! The “Res” button on the Cruise Control switch will become the speed limiter function if you did not change the right hand side switch. Test it if you want!
Step 10: Rotate your steering wheel to the right as shown below:
Step 11: Perform the exact same steps as mentioned previously above. Note that there are two connectors connected to this switch. It is harder to pull out as it is held tightly by the black connector.
Step 12: Cut the cable tie and free up the wires.
Step 13: Unscrew the 3 x Phillips screws and remove the back cover. Plug the molex connector back to the switch.
Step 14: Put back the cover as show below and screw back the 3 x Phillips screws.
Step 15: Note how short this black connector can be as highlighted in yellow circle below. How can you ever attached this connector back to the switch in such confined space? Does that means you have to take out the air bag???
Warning: This is the most difficult part of the operation! This operation is more suitable for people with smaller fingers. Maybe you will need to ask your wife or girl friends to assist in this operation!
The fortunate answer is no! You don’t have to take out the air bag. Simply pull the black connector together with the wire using only a tiny bit of your strength to extend it by few millimeters. Don’t pull it too hard until it gets disconnected from the steering wheel!
With the extended length, you will be able to plug it back to the switch securely and can push it back to the steering wheel. It takes some skill to do that but it’s definitely possible.
Step 16: There you have it! A Cruise Control switch enabled car?
Step 17: Not yet, you still have some coding to do! Perform VO coding by adding option 544 and then perform “Code” to all modules within your ECU. Remember to switch off your engine before doing that as it involves coding the DME module which requires engine to be stopped.
The whole process will takes about 5 to 10 mins. Lots of errors will start popping up! Once the coding has completed (With some errors reported on the modules in your E-Sys), wait for about 5 mins before starting your engine. Press the cruise control switch button and presto! The cruise control indicator is lighted up in your Kombi screen as shown below!
Coding success! Cruise Control ready!!!
Copyright © 2023, 2 GAT - 2GAT.sg. Proudly powered by WordPress. Blackoot design by Iceable Themes.